Setting Up Psi
Introduction Stuff
What is Psi?
Psi is a Jabber client, in the same way that the MSN Messenger program is an MSN Messenger client, and the ICQ program is an ICQ client.
More information can be found here.
What is Jabber?
Basically, Jabber is an Instant Messaging network, like ICQ. However, it has the advantage of open protocols and extensibility, which means that there is a huge number of clients avaliable, and they they don't all just do messaging. Jabber servers also sometimes have the ability to connect to other networks, such as ICQ, MSN Messenger, and AOL Instant Messenger (AIM).
More information on Jabber can be found here or here.
Why write this?
I use Psi as my primary Jabber client, however after walking several people through the set up of it, I got annoyed about how non-obvious some parts of the setting up are. This page is to allow you to follow a set of instructions that explains what is what in a (hopefully) useful manner.
This page is targetted at Psi version 0.9.
Downloading and Installing Psi
Psi can be downloaded from the download page.
How you install it depends on your operating system, and isn't covered here currently.
Setting it up
First time
When you run Psi for the first time, you will see a screen that looks like this:

Profiles
As nothing has been set up yet, the first step is to create a profile, by clicking on the Profiles button.
A blank list of profiles will come up, and then you select New to create a new one.

Profiles allow more than one person to use Psi, should the computer be shared or something like that. The name you pick should be something simple, just enough to identify you from anyone else who may use this computer also.
The other options here can wait until later if you are uncertain about them.
Once you have named your profile, you are brought back to the start screen, however this time the Profile box is filled in with the name you gave. Now select the default Open button.
Adding an account
Now a Jabber account needs to be added to your profile. The reason for this is that you can have more than one Jabber account in a profile, should you need to.

Give the account a name if you like, or leave it as Default. This name is what Psi puts at the top of the list of contacts for this account. If this is your first time using Jabber, you will want to select the Register new account box.
Registering the account
When you have done this, you need to provide the details for your account.

- Jabber ID
- This is the ID you wish to have. It looks like an email address, for example, mine is eythian@jabber.org. You can have whatever you like on the left hand side, provided it is avalible. The right hand side is the server name. Two common ones are jabber.org and jabber.com, however a more comprehensive list can be found here. you will also need to pick a password, and enter it twice.
If you are behind a firewall, you may need to specify a proxy server. If in doubt, or it doesn't work, talk to a network administrator. Most home users should be fine without anything here.
The advanced options can be ignored for the time being.
All going well, you should see this:
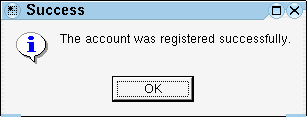
If you get a message saying Username not avaliable, then that means that someone has beaten you to the name, and you will have to think of another, or try a different server.
Account setup
Once your account has been registered, you should be put into the Account Properties window:

The new fields here are Resource and Priority'. These both deal with the ability to be logged on from more than one place at a time. I tend to have the resource set to where this computer is, such as Home. Priority determines where messages go to if they aren't sent to a specific resource. The resource with the higest priority gets it. This is used in suh situations where you may have a desktop that is online all the time, and a laptop that is only online sometimes. If the desktop has a resource of 5, and the laptop has a resource of 10, then whenever the laptop is online, it will get the messages, otherwise they will go to the desktop.
From here, you can go to the Details tab, and set up your personal information, and to the Connectionstab and set the options you like.
All set up
Once the Account Properties window is closed, you are left with the main Psi screen:
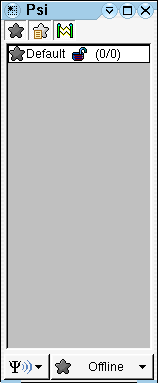
To go online, select the button at the bottom-left, currently reading Offline, and select Online from the menu.
When this is done, you should receive a message from the server:
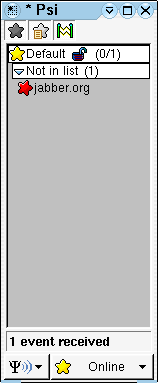
To view this, either double-click the name (jabber.org) or the bit at the bottom saying 1 event received. This message will provide links to a couple of other useful things.
Basic Usage
Adding contacts
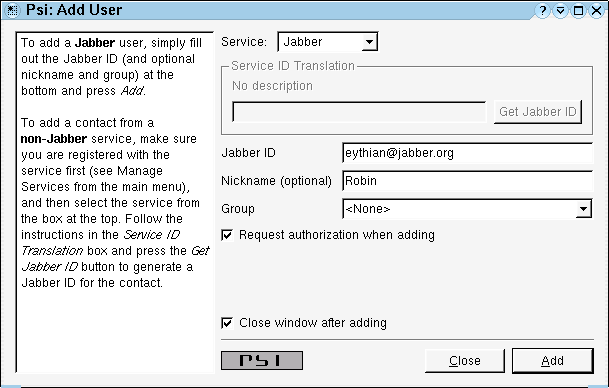
Having an instant messenger with nobody to talk to is not very useful. To add contacts, click the Ψ (pronounced Psi) menu, and select the Add a contact button. Fill in the details for the contact you wish to add, and then select Add. The group function allows you to sort contacts according to groups that you define. For example, I have them sorted between 'ICQ', MSN', and 'Jabber', however other options are 'Work', 'Friends', and 'Family', or whatever you like.
When you add the user, they will go into your roster, and look like this:
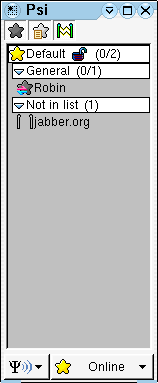
The little purple-and-blue arrow means that it is waiting for them to respond. With Jabber, you can't properly add someone to your contact list without them letting you. Once they have authorised you, you will probably get two messages: the first is them asking you if it is OK to add you to their roster, the second one says that they have authorised you. (This order may change). When you get this message:

you should click the Add/Auth button if you want them to add you.
Sending a message
To send a message, simply double-click the name of the person you want to send to. If they are not online, then the message will wait on the server until they log in.
Slightly more advanced usage
Transports
There are a few handy features of Jabber aside from the basic function of sending messages to other Jabber users, among these, the most useful are sending messages to people not using Jabber. The things that allow this to happen are transports. These are programs that run on a server that act as a gateway between Jabber and the other network. These are really intended not so much as a permenant method of bridging networks, but more as something to make the transition bearable until everybody just uses Jabber :)
For various reasons (one of them being that AOL blocked them from accessing the AIM and ICQ servers), jabber.org and jabber.com don't tend to offer transports. This doesn't really matter, as the nature of Jabber is such that even if you log into one server, you can use the features on another without much effort.
Setting up the ICQ transport
- Note: When you do this, you shouldn't run normal ICQ at the same time. The ICQ servers only allow you to be logged in once, and things may get confused.
The first step to setting up the ICQ transport is to find a server that runs it. For this, I will use elitesecurity.org. To show what services are offered by this server, click Ψ and then Browse Services. In the Address: box, enter elitesecurity.org and hit browse. It should end up looking something like this:

Double-click icq.elitesecurity.org, and in a moment it will pop up with a registration form. (elitesecurity.org appears to be hosted in Yugoslavia, so the prompts aren't in English). Simply fill in your ICQ details like this:

All going well, you should see a message telling you the registration was successful, and an authorisation request coming from the ICQ transport. Once you accept this, the transport will be a little green ICQ flower on your roster, and that means you are online with ICQ.
- Note: this does not import your existing contact list. If you don't want to go through the bother of adding everyone manually, have a look here. Also note that the JIT transport (a different version of the ICQ transport) will import your contact list, but as of this writing has bugs that make it quite painful for regular use. If you are feeling confident, you can use that to import your contacts, and then use the website to migrate them to the ICQ transport. This is not for the faint of heart however, as it isn't the simplest of procedures.
Adding ICQ users
It is obviously pretty useful to be able to add ICQ users to your contact list. Fortunatly, this is quite easy. Go to Ψ -> Add a contact, and where it says Service select the ICQ transport. Then add the ICQ UIN of the person in the box provided for that, and hit Get Jabber ID. You should end up with something along these lines:
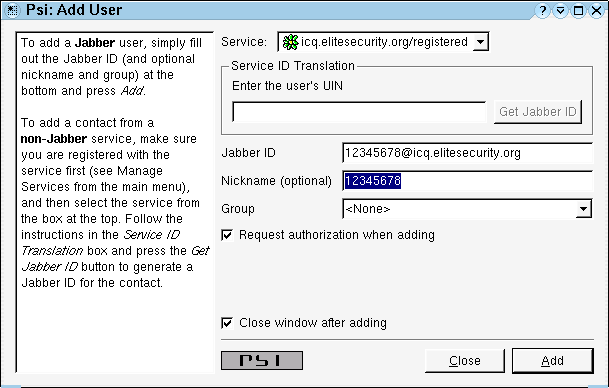
Give them a nickname, and a group if you like, and hit Add. You may have to go through the whole authorisation procedure again, after that, the user should be on your roster, just like another Jabber user.
Author
Robin Sheat, email: <robin@kallisti.net.nz> Jabber ID: <eythian@jabber.org>
Todo
- Adding MSN transports and users - this will wait until there is a new transport for the new MSN version avaliable.
- Searching for users
- Install instructions for various OSes?
- What else?
Notes
This is something of a work in progress at the moment, so may be incomplete. If there is something that plain don't make sense, or something you think should be here and can't be bothered writing yourself (see below), let me know and I may add it.
This is on a wiki page, feel free to edit it, fix my spelling, or add to it if you think it is warrented. Uploads are passworded, let me know and I can put screenshots up if you want.